|
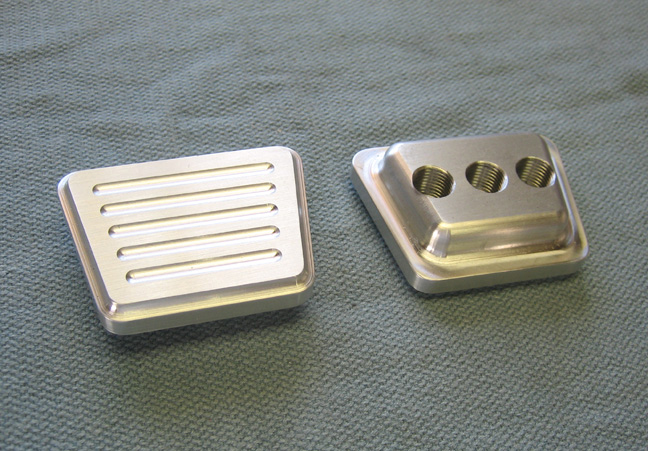
This is what the parts look like all finished and you can see what the
second tool did (1/8 radius) at the top better now (left). On the backside you can
also see what the
corner rounding end mill did at the top (right). I drilled and tapped 1/2-20
threads in three places so I could adjust them side-to-side if need be.
The holes are placed 5/8" apart and are 5/8" deep. Total time
on the second side was about 2 minutes. I know they are kind
of simple looking but I wanted something quick so I could get the car on
the road. On the other hand I don't think anyone else will have the
exact same pads in their car so I guess you could say they're one of a
kind. I might make something different in the future but I'm not sure
what yet. Oh by the way...I ended up with three parts.
I made a
short video to show some of the
cutting action of the first operation if you'd like to check
it out (20 mb). This should give you a better idea of what it looks like to machine
something like this.
|
|
 |
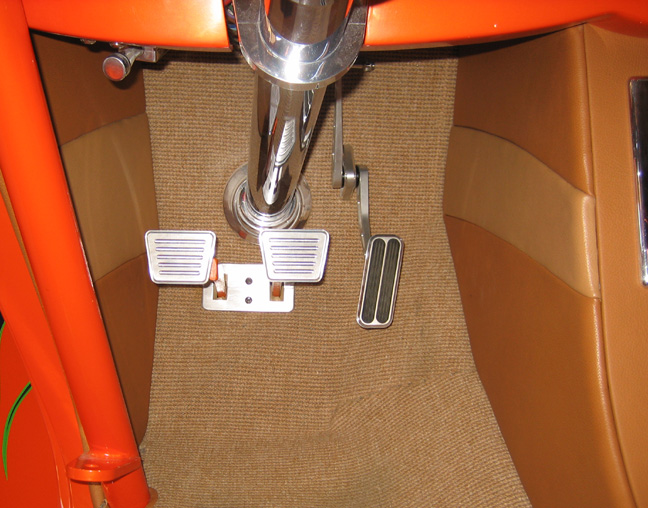
Here are the finished pads bolted in place. They feel
pretty good when I push on them but I have something else to deal with
now and that's my throttle pedal being to close to the brake. Even
though I moved the gas pedal over to the right by about 1 1/4" awhile
back I still don't have enough room here. In order to get enough spacing
between the clutch and brake pedal pads, I'm find myself pushing the gas
pedal while hunting for the brake. My foot just catches the corner of
the gas pedal every now and then so I need to move the gas pedal
assembly over a small amount to be safe here. I have an idea for this
because it's something I've been thinking about ever since I moved the
center console. Stay tuned.
|
|
 |
|
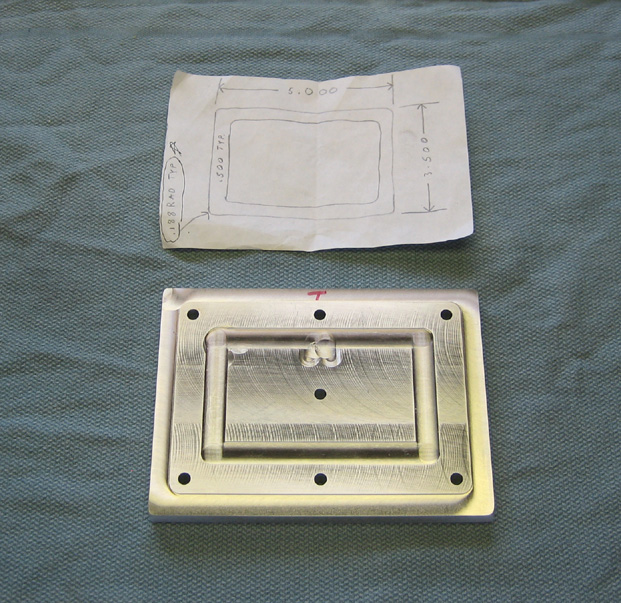
I talked about making tooling in order to make certain types of parts
and this is what I'm doing here. What you see below is a sketch of the
trim ring that will go around my shifter. The trim ring will be made
similar to the switch panels that I made on the center console which are
1/4" thick. When you're working with something thin like this you can
normally get away with just a vise setup. But when you have a radius on
all the edges that are 3/16" in size, that radius ends up going almost
all the way to the bottom of the part thickness. With that being said, there is no
way I could machine a radius like this without the bottom of the cutter
hitting the vise jaws so this is where tooling comes in.
What I needed to do is to make some tooling to hold the part while I
machine it along with enough clearance built in so the radius cutter
would work properly. The aluminum tooling fixture will provide these
features and I can hold this fixture in a vise. The six holes around the
perimeter are used to hold the trim ring to the fixture. The hole in the
center is my starting point which is where I will need to indicate and
then tell the machine where my work coordinates are.
|
|
 |
I used 10-32 screws that I cut the heads off of to hold the trim ring to
the fixture. The reason I cut the heads off is because the trim ring
will have blind holes tapped into it like the switch plates do so you
don't see any fasteners holding it in place. This makes it nice to look
at with no screws showing when it's installed but it's much harder to
make this way.
|
|
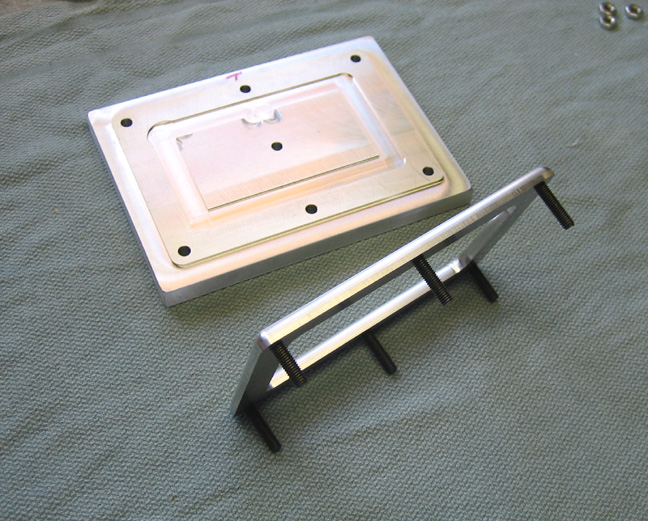 |
Here is the bottom side with nuts holding the part in place. The only
bad thing about this tooling is that I have to remove the fixture to put
another part in. I made two parts just in case I mess up one.
|
|
 |
|
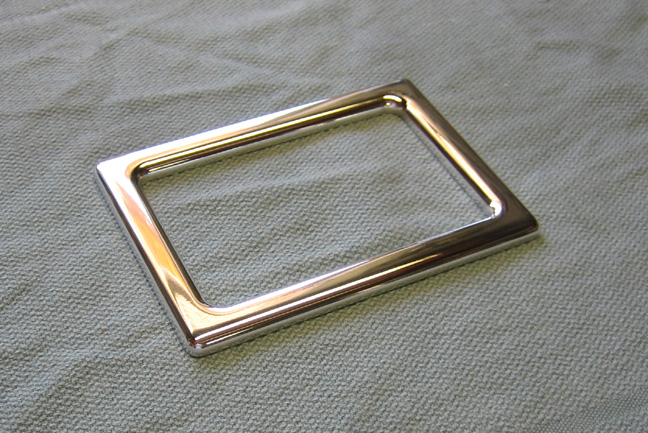
Here is the finished trim ring after a little hand work with my buffing
wheel. The radius matches the switch plates and it should look like it
belongs their once it's screwed in place. The inside of the trim ring is
the same size as the opening in the console and all the sides are 1/2" wide.
Now I need to make a boot which I still don't have a clue how to do but
I'll give it a shot soon. I'm pretty sure I'll need to do some sewing on
it so that will be a first for me while working with leather.
I had to bleed the brakes and clutch again and I adjusted them both
too. I also removed the ramps that the rear tires were sitting on and
put jack stands in their place. The reason for this is so I could start
the car to try out the clutch and then have the tires spin in the air.
Come to find out the clutch didn't want to disengage properly so I
adjusted the pushrod to make it longer and that seemed to make the
difference. By making the pushrod longer it pushed the plunger deeper
into the master cylinder putting a preload on it if you will. I'll be
test driving the car next week to see how things work and find out what might
need to be adjusted or tweaked on. I can't wait!!
Next week I'll need to start making a boot, relocate my throttle
pedal and if you were wondering, I ended up with only one part (below).
|
|
 |
|
1
2
3
4
5
6
7
8
9
10
11
12
13
14
15
16
17
18
19
20
21
22
23
24
25
26
27
28
|
|
29
30
31
32
33
34
35
36
37
38
39
40
41
42
43
44
45
46
47
48
49
50
51
52
53 |
|
54
55
56
57
58
59
60
61
62
63 |