|
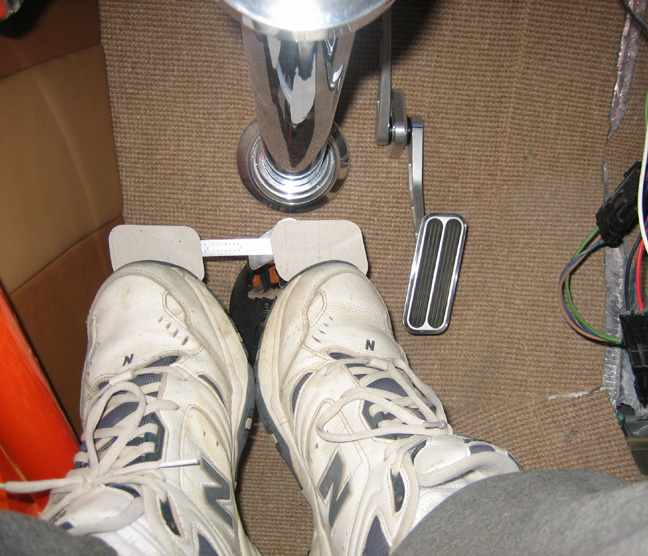
With the magic of scissors we have a change in pad size. If you look
close I've drawn a line on the cardboard that is in the center of it.
I've also drawn another line one inch to the left of center which is
in-line with the 1/2" mounting hole of the brake pedal arm. What I'm
doing is getting an idea of what I may need for my setup. I've also cut
down the size of the cardboard pedals which is giving me a little more
room because as you can see I'll need all I can get. And with that bar
of my roll cage in the way isn't making it any easier because it's
taking up some valuable space. But I don't want to remove the cage so it
looks like I'll have to get use to that.
What it looks like I'll need to do is move my brake pedal over one
inch to the right because I think that would work the best.
|
|
 |
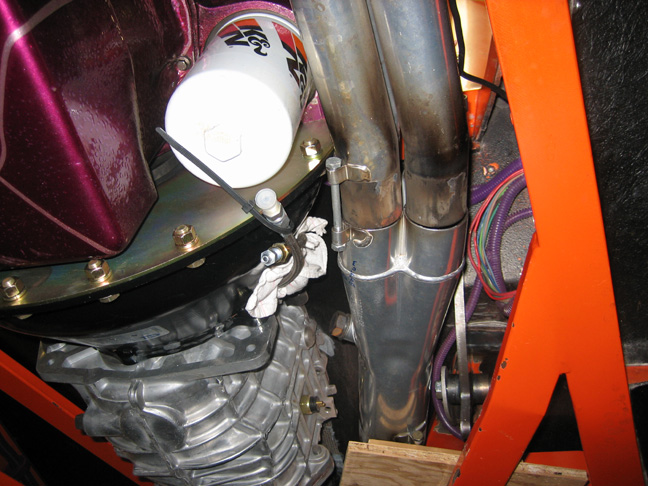
| Another problem that I'm dealing with is clearance
problems for my headers. Now this isn't a total surprise to me because I
knew this might be an issue before I started this project. When I moved
the pedal bracket back 2.500" on my X member, it also moved it closer to
my exhaust system. If you look close you can see a gap in my slip
collectors which means it's not in the right spot and won't slip
together anymore. Notice the bolt that's holding the header to the
collector, those two brackets should be against each other. I'm not able
to slide the tubes into the collector anymore because of the new pedal
bracket. They are sticking out by about 2.0". Also notice I have some
wood clamped in place to rest the other end of the collector on. What
I'm doing here is finding the right spot for the collector to be in and
what it will take to do that. If you look close you can see the bolt
holding the new pedal on is about 1/8" away from my collector which is
right where I would like it. This means I'll have to hack on my headers
to make this all work along with the exhaust tubing on the other side of
the collector too. The reason the exhaust tubing will have to be
addressed is because it will be at a different angle once I have the
collector fitting again. Can you say snowball affect?
|
|
 |
|
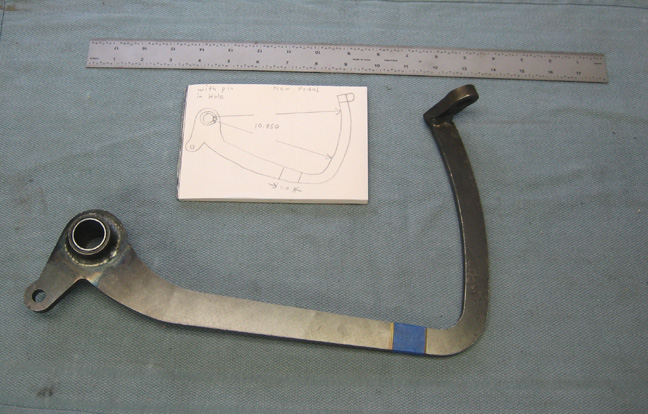
This shot is looking straight up from the floor of the garage (scroll
down and take a look). You can still see the gap in the headers and next
to that is the brake pedal arm. Notice the small red marks next to the
white arrow. Those represent different distances from the main frame
rail to the pedal arm. The reason I have different distances is because
the frame isn't parallel to the arm which is going to be a problem for
my clutch pedal. When both pedals are side-by-side and are ready to be
installed, they total a certain distance. That total distance is fine
where they bolt up but then the clutch pedal hits my frame rail soon
after that and I can't install it.
What I need to have is more clearance for the clutch pedal so what
I'm doing is here is getting a few measurements. The blue arrow is
pointing to the frame rail and the brake pedal arm. The blue arrow
represents about 2 3/4" and that's not enough. What I need to do is
create more distance which means more cutting and welding. The only
reason I ordered these pedals from Total Coast Involved is because I
didn't think I would have any problems installing them. I mean after all
they are the same people that made my chassis. If I knew all this before
hand I would have just made my own and saved myself some money and
headaches.
Like I said earlier the red marks on the pedal (white arrow) are
different distances from the pedal arm to the frame rail. If you
measured from each red mark to the frame, each mark represents .100"
difference between the two. The one to the right of the white arrow is
the closest to the frame with a minimum of clearance at that spot. What
I'm going to do is cut at the middle red mark and add a piece of
material to it and dog-leg it over a little so it clears the frame. Time
to start cutting and welding both pedals.
|
|
 |
I did some measuring and came up with a plan, I don't know if it's a
good plan but I have one non the less. I'm going to start with my brake
pedal and cut through where the blue tape is. This won't be just a saw
cut because I plan on removing a one inch section here. The way I'm
going to do this is on a milling machine because I can remove exactly
the amount I need with a nice straight cut. After that I'll make a piece
to weld back in it to end up with a one inch off-set to the right.
|
|
 |
Here's the pedal with one inch removed. I also put some lines on each
piece before I unclamped them from the milling machine for reference.
Now it's time to make a piece to weld in it.
|
|
 |
|
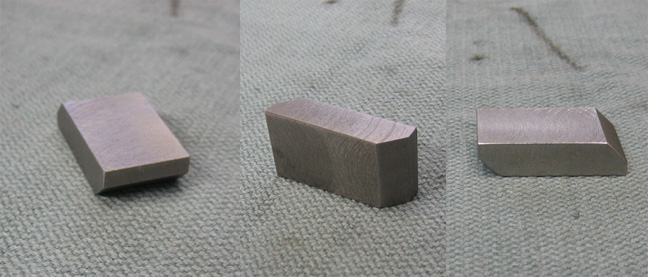
Starting from right to left: it's 3/8" thick to match the my pedal
thickness. It has a 45 degree cut on both ends which will locate against
the pedal surfaces. The distance between the two 45 degree surfaces are
1.000" which is what I cut out of the pedal. What this will do is place
the top half of the pedal over to the right one inch once it's welded.
This piece will be placed at a 45 degree angle instead of a right-angle
when finished. The small straight cut next to the 45 degree angle is
weld preparation area. It's at a right angle to the top and bottom
surfaces but once it's against the pedal arm it will provide half of the
V groove for welding. For those of you that don't know what 'weld prep'
is, it's an area that is shaped like a V and is lower than the surface
that you intend to weld on to get good penetration. If you were to just
put one piece against another (butt weld) you would end up with a large
weld sticking out from the surface and that isn't what I want. By adding
a weld prep area you end up with a weld that isn't raised much and it's
stronger too.
To the left you can see it's made with a slight taper to match the
pedal arm (go back and look at the picture above) and will match the
width on both ends now.
|
|
 |
|
1
2
3
4
5
6
7
8
9
10
11
12
13
14
15
16
17
18
19
20
21
22
23
24
25
26
27
28
|
|
29
30
31
32
33
34
35
36
37
38
39
40
41
42
43
44
45
46
47
48
49
50
51
52
53 |
|
54
55
56
57
58
59
60
61
62
63 |