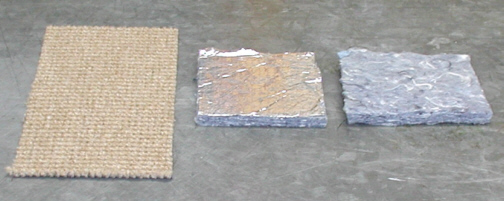
This is the insulation that will go
under the carpet. It's made by Tru-Max and it's made
from a dense, mutli-layered fiber cloth packing, a fire-retardant
coating, and a double aluminized outer layer on one side
to reflect heat away. The
insulator mats can protect you from heat up to 400 degrees F. It
measures at about 5/16" thick and my carpet is about 1/4" thick. I think this insulation will work good because
it retains it's shape unlike a fiberglass type. The fiberglass
types seem to squish-down very easily and after buying both types, I'm
going with the Super
Insulator mats by Tru-Max.
|
|
|
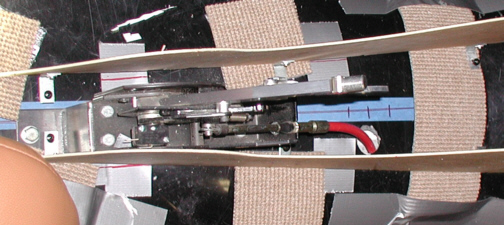
This shot shows you how I'm going to
fasten the wood sides to the body. I'm using some 1" X 1" X
1/2" wide X 1/8" thick steel "L" brackets every nine
inches to hold the sides in place. I'm using sheet metal screws to hold
the brackets down to the floor because after drilling a hole that's
smaller then the screw, then screwing it in, they go into the fiberglass
very hard so they won't rattle loose. There are two more "L"
brackets that hold the front of the console to the firewall that you can't
see for a total of five per side. I also made a small bracket that holds
the top of the console to the dash for a little extra support.
|
|
|
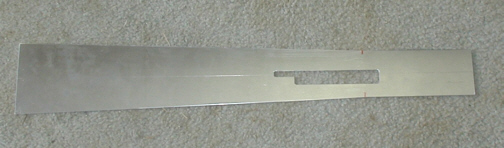
Now that the sides are in place, it's
time to make a piece for the center. I'm going to use 6061-T6 aluminum
that is .090" thick for this piece which should be plenty strong
and retain the curved shape that has to be made. The main reason that
I'm using this aluminum is because I couldn't find anything else at my
work that was even close in the scrap pile. I bent a small piece of this
aluminum to see how far it would bend before it would brake because the
last thing I needed was to have this almost done and then have it crack.
After standing on a scrape piece and bending it 180 degrees, I knew that it would
work for me but it was going to be tough to form. When you have a
"T6" condition with aluminum, that means it's been heat
treated. A "T zero" condition is soft and would bend much
easier but it's not nearly as strong. I first sheared the piece to 28
3/4" long X 4 5/8" wide and then milled it to the angle that
you see below. The bottom (right side) is straight for the last 7"
X 3" wide. I also made the cutout for the shifter and
reverse-lockout lever because it's much easier now than after it's been
bent. I'm not going to make a cutout for the switches just yet because I
don't know exactly where I want them so they will have to wait till
after I do some forming.
|
|
|
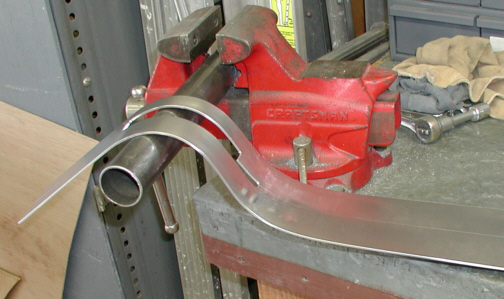
To do the forming, I used a scrap
piece of 1 5/8" diameter roll-bar tubing which was clamped in my
vise. I worked the material a very small amount at a time till I ended
up with what you see here. What I mean by a "very small
amount" is an 1/8" at a time. By placing the material on top
of the tube, then applying pressure to it, you try to bend the material
a small amount. But if you put too much pressure, it will leave a radius
far to small and you'll have a hard time getting it back out if you can
get it out at all. I bent this shape by bending and moving it at
1/8" intervals back and forth which took awhile because I needed to
check my progress against a welding rod pattern that I made. I still
need to bend one more radius which has been started where it meets the
work bench.
|
|
|
|
1 2
3 4
5 6
7 8
9 10
11 12
13 14 15
16 17
18 19
20 21 22 23
24 25
26 27
28 |
|
29
30
31 32
33 34
35 36
37 38 39 40
41 42
43 44
45 46
47 48
49 50
51 52 53 |
|
54
55
56 57
58 59
60 61
62 63
64 65
66 67
68 |