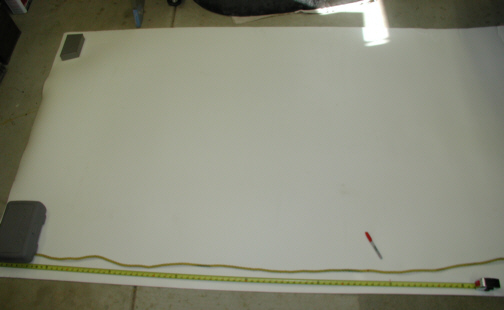
I'm getting ready to cut this foam to
length for the top rear panel but needed to know what length to cut it at
first. I used a rope
to find the dimension that I needed because of the curved surface. I
marked the rope and then laid it on the foam and added six inches to it....just because. Now the height seemed straight forward as it was 13"
but after thinking about it for a minute, I wasn't so sure. I also
needed to take into account that two pieces were going to be used from
this 60" wide chunk of foam. The other piece will be used for the
bottom portion that goes behind the seats which is taller than the one
I'm working with now. After measuring the other panel and this panel, I
had plenty of extra foam to work with so I was going to leave myself
several extra inches to play with. I cut the height at 21" just to
be safe. Why 21"? I don't know but it just seemed right at the
time.
|
|
|
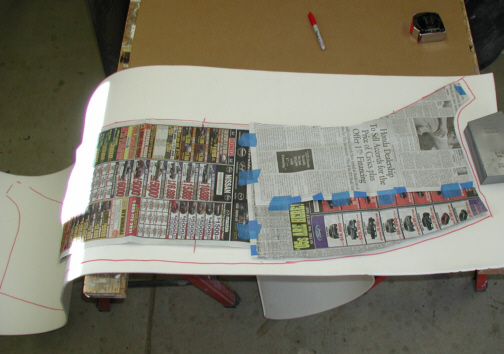
After cutting out the foam, I held it
up in it's position to see how things looked. What I mean by holding it
up in position is I'm going to install the panel where it needs to be and
then work with installed instead of making a wooden jig to do it all on. This makes things
harder because I'm inside the car but at least I know that it will fit
when I'm done. Well the foam didn't fit like I wanted because of the curved
surface. I noticed that while holding it on the straight section in the
back, then trying to bend it around one of the curved ends, it would
wrinkle so I needed to cut some foam in a couple of places, but which places?
I didn't know exactly so I
made a pattern out of newspaper and then transferred it to my foam.
Because the curves were the same on both ends, I could use my pattern on
either side by flipping it over and then tracing around it. Notice how
much room I had left over from top to bottom. After adding eight extra
inches and thinking that I'd have way more than I needed, I only had
about one and half inches to play with. I didn't take into account how
much curve that I was working with when it was laid out flat so I got lucky with this one.
|
|
|
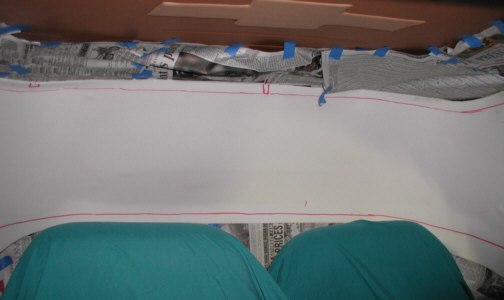
Here you can see the foam has been
glued on. I first masked off the area around the panel and covered the
seats with an old sheet before I sprayed any glue. By masking off the
area around the panel and then spraying the glue, this would keep the
right shape and contour so the foam would go on correctly. I was
thinking that if the panel wasn't setting like this, the foam would or
could have wrinkles in it. I'll be doing the same thing when it's time to
put the material on. I marked a center
point on my foam and matched it up with another mark that I put on the
paper to make sure I
started out in the right place because I didn't leave myself very much
room for any
errors. This worked out good but it's a little cramped inside doing it
this way. Now I need to feather out all the edges so it won't have such a large step between panels once there're covered with
material.
|
|
|
| 12/19/04
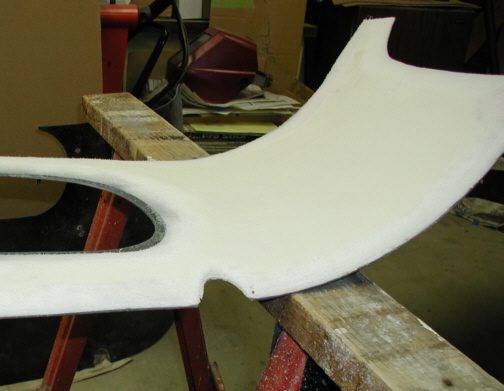
I sanded all the edges so the transition between
the two panels would have a closer fit. It's hard to see here but I
feathered the edge back 1 1/2" to 2" all the way around. I
left a small amount of foam around the opening for the down bars to pass
through so it will hug the tubing without any gaps because when I was
cutting out the fiberglass section around the tube, I made them just a little
large. If you notice, the window opening has been trimmed back a small
amount from the edge. I didn't plan on doing this but after placing the
panel in the car and then trying to install the window trim, it wouldn't
fit. The reason it wouldn't fit is because the foam is 1/4" thick
and now the screw holes were off by that amount so I drew a line around the
window trim and cut out that section. I feathered out the edges around
the opening like I did for the rest of the panel till the window trim
would fit. It's a good thing I tried the trim now and not after this
panel was covered.
|
|
|
|
1 2
3 4
5 6
7 8
9 10
11 12
13 14 15
16 17
18 19
20 21 22 23
24 25
26 27
28 |
|
29
30
31 32
33 34
35 36
37 38 39 40
41 42
43 44
45 46
47 48
49 50
51 52 53 |
|
54
55
56 57
58 59
60 61
62 63
64 65
66 67
68 |