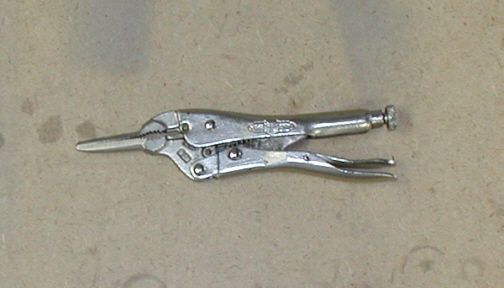
I took a pair of needle-nose
vise-grips and ground down the nose. Does it look like a dolphin to
you....or is it just me? I also removed the serrations that are inside of the jaws because they are very sharp. I was now ready to start some
surgery.
|
|
|
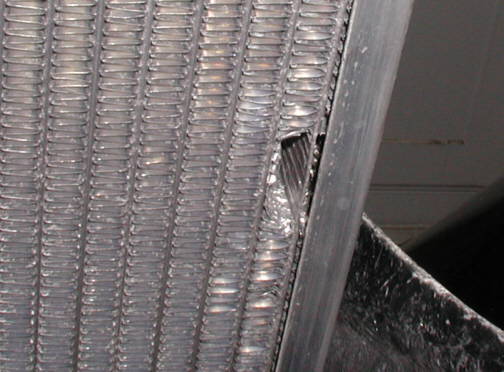
What we have here is the problem area
to work on. I made room for my newly ground tool with a six inch scale
and was now ready to get to work. The reason I used my six inch scale is
because it's thin (unlike a screwdriver) and flex's easily which means I
would have to take my time. One wrong move with a screwdriver and I
might have two holes to fix. I then started squeezing the tube from the
top to the bottom around the hole and then moved inward about a
1/2" and repeated the process over and over till I had reached the
rear of the 1 1/2" tube. My plan was to see if I could reduce the
amount of water that was coming out at all. Now this tube is only
.075" thick to start with and water has to run down the center of it which means
the tube has a VERY thin wall. This is why I removed the serrations from
the jaws before I started so I wouldn't poke or produce another hole. After
I was finished crimping the tube, I refilled the radiator and watched to
see if I had done any good or if I made a sprinkler system. It was
peeing out the first time and now it was just seeping. This is what I
was hoping for. At this point, I didn't have much to lose and I had one
more ace up my sleeve....I think!!
|
|
|
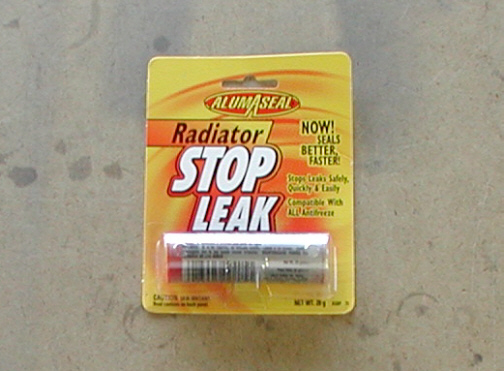
I went down to the parts store and
bought some stop leak made by AlumAseal. I had nothing to lose and
everything to gain. All I had to do was pour it in the radiator, top it
off with water, put the cap on and drive the car till the leak stops.
Now I'm not able to drive the car yet so I started it up and ran it for
15 to 20 minutes. I would have run it longer but I don't have a fan on
it yet so I turned it off when the temp gage reached 190 degrees. Well
for a buck eighty-five, this did the trick and I couldn't be
happier :-] AlumAseal says that the fix would be permanent
so I guess I'll have to see what happens. For now, I'm very
happy....again!!!
|
|
|
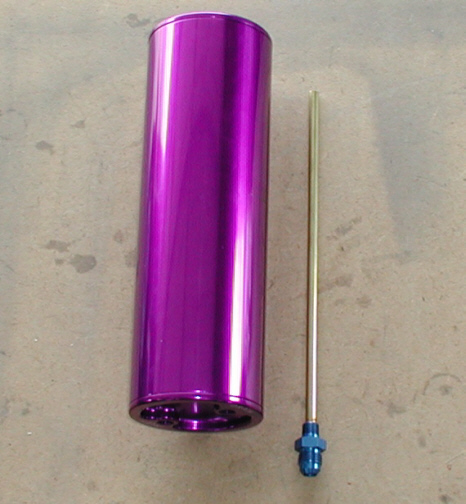
Now that the radiator seems to be
fixed, I'm ready to finish the over-flow container. What I did was turn the
container upside-down to use it. I'm using a brass 1/4" diameter
tube that runs from the top to the bottom of the container that is cut
to within a 1/4" of the bottom of the container. This way when the hot
coolant starts to over-flow into the tank, it will have a way of
returning to the radiator. I drilled and reamed for a press-fit in the
fitting below. The fitting has 1/8" pipe on one end and 6an on the
other. I opened up the end with the pipe threads as it had a step inside
it so this way, the step is almost gone now. The brass tube measured
right at .250" so I reamed the hole .2495" for a light press
fit. The other end will be getting some braided steel hose running from
the radiator to this fitting.
|
|
|
|
1 2
3 4
5 6
7 8
9 10
11 12
13 14
15 16
17 18
19 20
21
22
23 24
25 26
27 28 |
|
29 30 31
32 33
34 35 |