|
Valve Train Problems 6
4-15-14
|
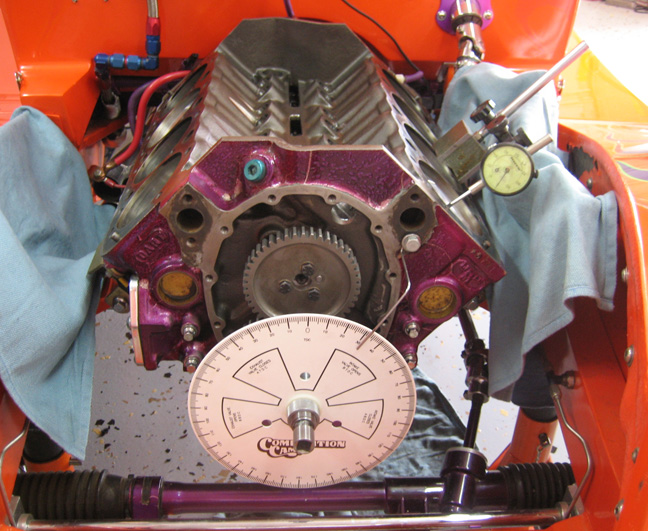
I've heard of people checking their camshafts and being off by as much as eight
degrees. Now that's a bunch and would leave you wondering why your engine
isn't running like it should. With that being said, checking to make
sure you have it installed as the manufacture intended it is easy and
time well spent. What you need to do first is find 'absolute top dead
center' which is what I'm doing in the picture below. Now being close
here isn't going to be close enough so you need to take the time
and find it before you start. Once you have absolute top dead center
you're ready to degree in your cam, which means it's time to move the
dial indicator from the piston top over to the top of the lifter.
Once your indicator point is on your lifter, you rotate the engine
till your get a reading of .050 and then stop. At this point you check
the degree wheel and take your reading and compare it to your cam spec
sheet. In my case I started with the intake valve which gave me a
reading of 22 degrees before top dead center. Once you've done that it's
time to keep rotating the engine over till your indictor reads .050
and then stop. Take your reading again and compare it to your spec
sheet and in my case it was 62 degrees after bottom dead center. Both of
these readings were exactly what my other cam was which was good news
because that meant my cam was in the correct spot.
Now lets say you were off by a couple of degrees when you did your
check. Some timing sets come with offset bushings so you can retard or
advance the cam if need be. In my case, I have a zero, 2, 4, 6 and 8
degree offset bushings that came with my timing set. I've been using a 2
degree bushing ever since I've had the car on the road and decided to
leave it in there for my first check. Well as luck would have it,
everything checked exactly like my old one did the first time around so I
was good to go.
|
|
|
|
The Rebuild Begins, But...
|
4-21-14 |
|
When it's time to install a camshaft, there are some key things that
need to be done along the way. The first thing was to
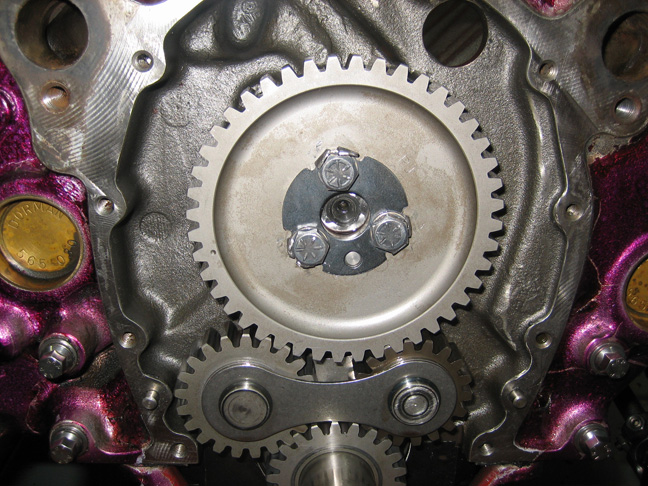
attach the timing gear to the camshaft and then torque the bolts down.
But before doing that a very important piece needs to be in place first
which is called a lock plate. This locking plate acts like a fail-safe
to help prevent the cam bolts from coming loose.
The lock plate goes behind the fasteners and has tabs that get bent
around the bolt heads to help keep them from ever coming loose. Before torquing the bolts, I used some ARP assembly lube on the threads and
then tightened them down. Once that's done, I used a small sharp chisel to get behind the
locking tabs to bend them a small amount first. Then I used a 3/8"
diameter punch to form the tabs into place around the bolt heads and
that's it. At least that's what is suppose to happen....(shaking my head once again).
|
|
|
|
What you see below is my new lock plate. And why is my new lock plate
not looking new anymore and sitting on
my work bench instead of on my car? Well it's like this....see the
larger diameter hole in the center of the plate? When I tried to install
my cam button (right of the plate) it wouldn't go through the hole. I
must have tried two or three times and then decided to measure it
with my calipers. Well wouldn't you know the hole in the plate is .030
smaller than my cam button. I had to remove it but in doing so, you have
to get under the tabs, bend them out of the way and then you can remove
the bolts.
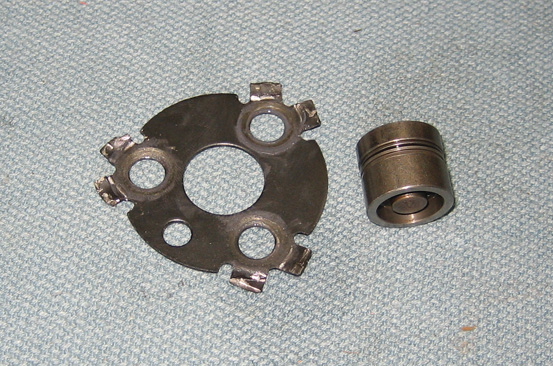
A cam button is used in the front of a camshaft to keep it from
walking (moving front to back). And roller cams seem to do a lot of
walking so a cam button prevents this from happening. A cam button like
this one has a bearing between the two halves. The front of it rests
against the timing cover and the back goes against the cam sandwiching
the cam button between the two. So as the camshaft is spinning, the
bearing in the button spins but the front of the button doesn't. This
works out so the timing cover doesn't end up with a hole getting rubbed
through it either.
I have some good news here which was very unexpected. I ordered a
bunch of parts from Summit Racing Equipment for this valve train problem
including, head gaskets, intake gaskets, exhaust gaskets, etc; along
with this locking cam plate. About a week after I received my parts
Summit Racing emailed me about doing a survey rating/review for their
store and their products. This is something new for Summit but I can
understand why with so many other stores doing this, which helps in
making a decision for the consumer.
Now this wasn't good timing for Summit Racing and their new
rating/review system because this really pissed me off. But being the
good guy that I am.... I decided to start with this product and give it
a rating. Below is how I rated it and my reply about the lock plate:
Review Text: I installed this lock plate only to find out
afterwards that the center hole isn't large enough to except a cam
button. Needless to say I had to remove it and use my old one (which is
a different design). It would be nice to advertise the center hole
diameter to avoid this problem in the future.
Overall Rating: 1
The rating system goes from as little as 1 star to as many as 5
stars, and as you can see I only gave them 1 star. Below is what Summit
Racing replied with:
Kevin,
Thank you for your feedback.
You are being contacted in regards to the product review you filled out
for us. We value your comments; they help us improve our products and
service to insure you get the parts you want, when you want them. We
apologize for any problems you may have had with the item you ordered.
For the trouble I am going to just refund you on that item. Do not worry
about returning it back to us, as it would not be worth the shipping
cost to us.
We appreciate your business.
Regards,
Carson
All I can say is, thank you Summit Racing for making things right.
Now lets hope their bolts that I used don't fail (as my eyebrows go up,
my teeth clinch together and my mouth making a frowning face as if to
say...'eeeehh').
|
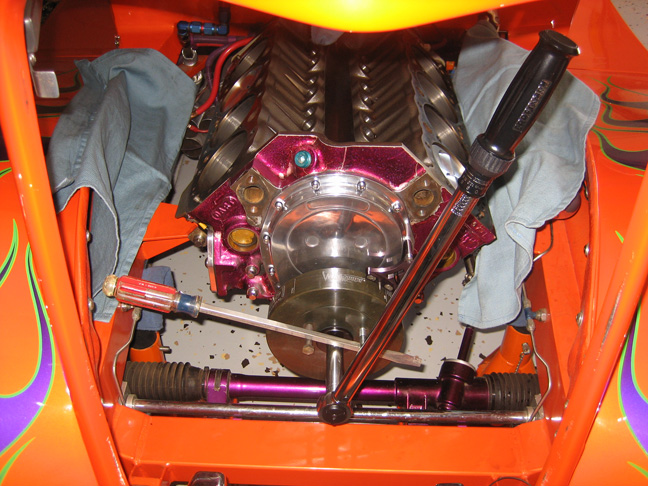
Once I had all that behind me it was time to reinstall everything,
starting with the timing cover and cam button. Once that was on, I put a
small amount of anti seize on the crank snout and to the inside diameter
of my harmonic balancer before installing it. To keep the harmonic
balancer in place I set the torque wrench for 70 lbs; put a little
assembly lube on my 7/16 bolt and tightened it down. Note the use of two
bolts and one large screwdriver to aid in holding the engine from
rotating while waiting for the click. Whatever works ya know.
|
|
|
|
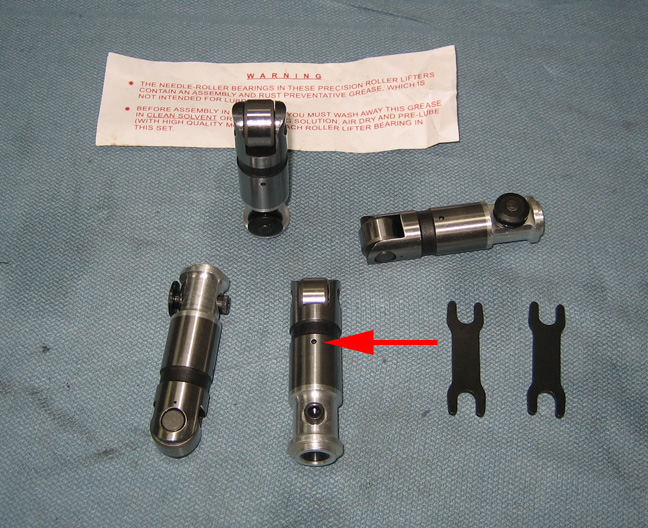
New Lifters
Here are the four new roller lifters that Isky sent back to replace
my old ones. Isky calls them 'rebuilt' but they look brand new to me
without one scratch on them. I did see one difference between these and
my old ones, which has to do with the oil hole (arrow). My old ones had
a small slot between this oil hole and the oil slot but only on one
side. The new ones didn't have this slot on either side so I called Isky
to find out why. They said these were a new design and didn't need the
slot and run them as is. They also said that they made some internal
changes to help with oiling and because of this, the slot wasn't needed
any longer. This seemed like good news so I thanked them and proceeded
to assemble the engine.
|
|
|
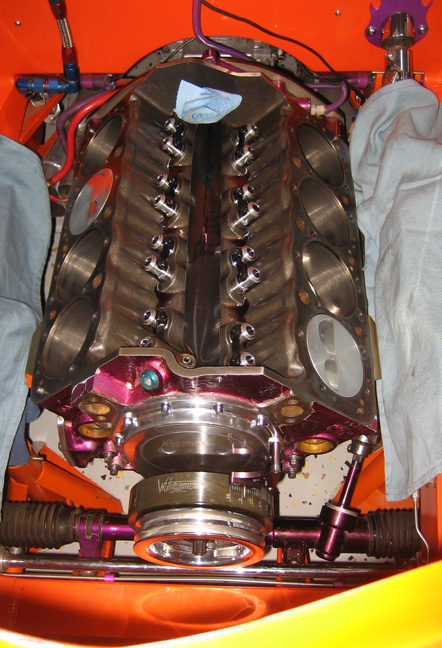
Here you can see all of the lifters in place and now I'm ready to
install the rev-kit and cylinder heads. Notice the duct tape and paper
towel inside the valley of the block. This was just insurance to make
sure nothing small went down into the engine. If you go back and look at
the first picture on this page, you'll see that Dart (my engine block
and cylinder head manufacture) puts slots in the center for better
oiling of the cam and better oil drain-back.
And yes I'll wait till you come back after checking out the top picture
again.
|
|
 |
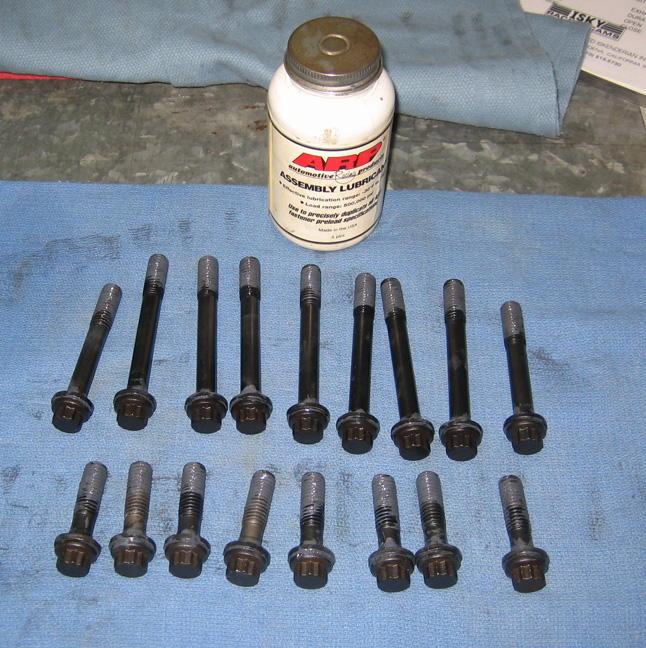
| I'm getting ready to install the cylinder heads but
before that happens, I'm putting some assembly lube on the threads,
washers and under the bolt heads. This is a very important step in
engine assembly because it provides an even pull on the threads when
tightening your fasteners. If you were to leave them dry, this would
cause an excessive amount of friction on the threads which would result
in the wrong amount of stretch of the fastener. That also means it would
end up being the wrong amount of torque which wouldn't meet the manufactures
specs.
Assembly lube also helps in these other areas: Eliminates preload
scatter (preload error there would be during installation), remains consistent on every cycle, resists fastener loosening,
saves time (no need to re-torque a bunch of times because it maintains
consistent clamping force). I put this lube on dissimilar metals and like
metals, for almost every fastener on the car. For instance,
stainless-to-stainless (bolt and nut). If you've ever assembled two
stainless fasteners together and then tried to take them apart after a
few years, you can end up with a mess because stainless has different
properties than steel, even if it's heat treated. Once the two start to gall together, they try to
become 'one' but using a small amount of lube makes all the difference in
the world.
|
|
|
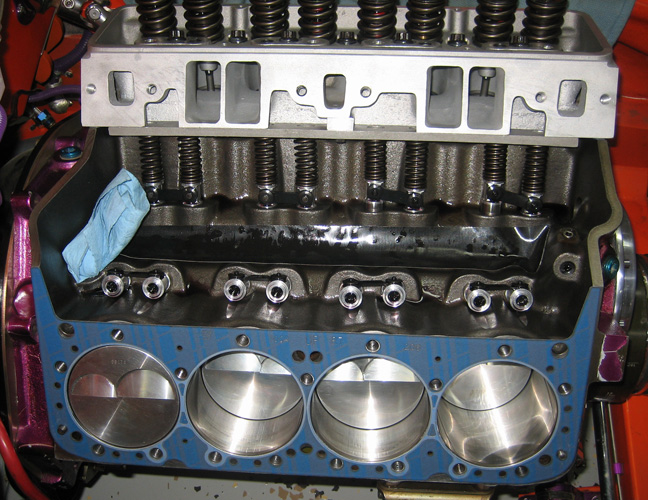
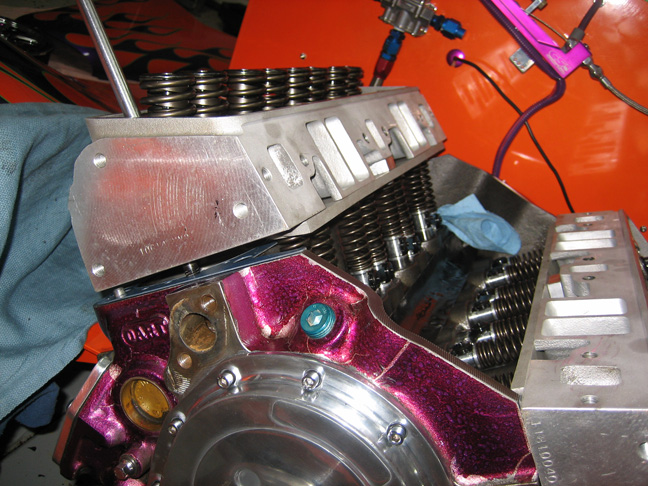
| Here you can see that one cylinder head has been installed
along with the rev-kit. A rev-kit is something used on a solid roller
cam to help keep the rollers in contact with the camshaft. You don't
need this on a hydraulic or flat tappet cam because those lifters are of
different design. Solid rollers have small wheels on the lifters with
even smaller needle bearings in them. Those needle bearings are
vulnerable to shock, which might happen if your engine were to over-rev,
so this helps keep the lifter on the lobe at all times.
Mike at Engine Supply told me that he didn't think it was a good idea
to run a rev-kit as this was old technology. He called his friend Joe
Sherman to confirm this but Joe told him that a rev-kit was a good idea
on the street but not at the track, like a drag strip. This was very
nice of Mike to make this call, which I didn't ask of him, but he did it to
help me out. Very cool. I was also told to use my rev-kit by Iskenderian
Racing when I was talking with them as well. So think of a rev-kit as
insurance for the street if you're using a solid roller cam.
BTW, each spring in my rev-kit produces 60 to 80 pounds depending
where the lobe of the cam is. Now combine this with the valve springs
pressure of over 500 while open and you have around 600 pounds of force
on each cam lobe at any given time. Yeah I know...it's a bunch...
especially for the street.
|
|
 |
|
Here I'm getting the other cylinder head ready to bolt down. Notice the
rev-kit springs are keeping the head in the air which can be a challenge
to get lined up and into place. I used two of the longest bolts and put
them at the ends of the head (where the two medium length ones go) which
is long enough to get the threads started and then I can draw the head
down. Once I have the head close to the block, I use some longer bolts
in their normal position and pull the head into place. Once I have the
head close, I remove the long ones at the end and replace those with
medium length ones that belong there.
The ARP head bolts call for 70 foot pounds if using oil but if using
assembly lube then you can go to 65 ft lbs. However, if you're using
aluminum heads and lube then go to 60 ft lbs. I set the torque wrench to
30 pounds first, then 45 and finished with 60. By tightening the
bolts in steps like this, it brings the head down nice and even.
|
|
 |
|
1
2
3
4
5
6
7
8
9
10 |
|