33 Coupe Adjusting and Tweaking 14
5/16/09
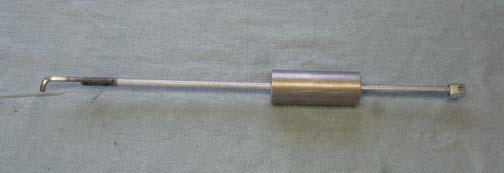
| This is what I came up with to get that seal out, a small slide hammer that I
made. I welded a hex-key on one end and double-nutted the other to act
as a stop. The round piece of steel which acts as my weight I made at work, which is 1 1/4"
X 4" round stock
with a 7/16" hole through it.
My plan was to have the end of the hex-key up against the back of the
seal and then pound away on it till it came out. It sounded good to me
but the only thing that happened was the front of the seal got deformed and
pushed out. No matter how many times I tried, the end of the hex-key
tried to slide off and ended up slipping more than anything else.
After working for about an hour with this tool, I gave up and went
back to the drawing board in search of something else.
|
|
|
|
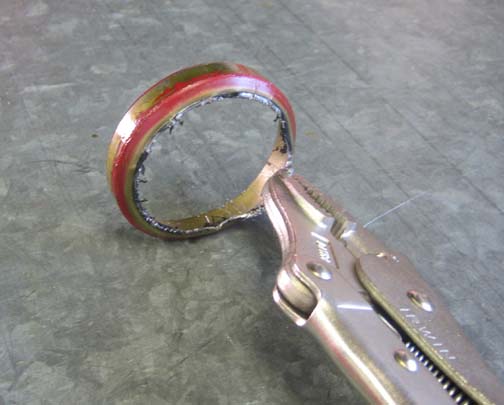
You know the ol' story, when in doubt use a bigger hammer, which is just
what I did. Although this doesn't look like a hammer, you haven't seen
the whole tool yet. Check out what I came up with to get that seal out.
Oh by the way, now you can see how the first tool deformed the face
of the seal. This is what prompted me to try something else.
|
|
|
| I made a slide hammer out of a pair of vise-grips. I
thought that if I could bend the front lip of the seal out just a little
with some pliers, then I could grab it with a something. Well the
something that I came up with was a pair of vise-grips on steroids. The
thread size of my vise-grips were 7/16" so all I needed was some
all-thread that size and a larger piece of steel for the hammer part.
This time I used 1 3/4" diameter material for the hammer and once I
tightened the vise-grips down, all it took was two or three whacks and
out it came. That put a nice big smile on my face. And after I had
everything all nice and clean, it was time to put the new seal in.
|
|

|
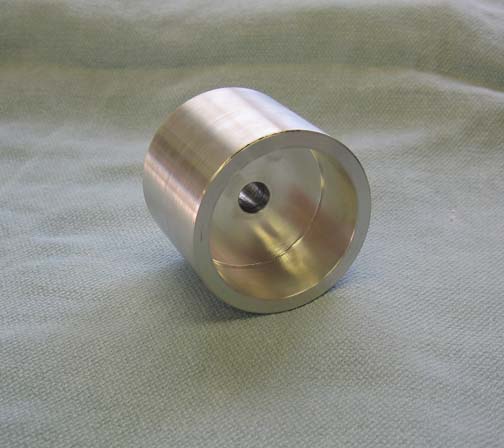
It sure is nice working at a machine shop because I can
dream up things and make just about anything I want. This is what I made
to press in the new seal. It's made out of aluminum and slips over the
end of the crankshaft. The hole is 7/16" diameter which is the same size
as the harmonic damper bolt. And the front lip of the tool is the same as
the seal face so it shouldn't hurt it as I press it in.
|
|
|
|
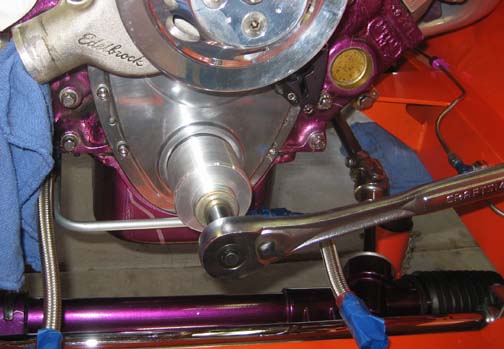
Here you can see the new tool in action. I used a few washers to take up
the extra length of the damper bolt and after a little black RTV on the
outside of the seal, it went right in. This worked really well and I
know it went in nice and straight too. One more thing, I didn't even
have to swing a hammer to install it either.
It's been about three weeks now and there hasn't been any leaks so
everything is working great again. And while I had the radiator out
along with a few other items, I was able to get at some of the hard to
reach areas and cleaned things up a little. I'm glad it only ended up
being the timing cover seal instead of the pan gasket because I didn't
feel like messing with that. Although I didn't feel like messing with
either one, I'd take the timing cover over the oil pan.
Let's hope I don't have to make any new tools for awhile because that
might mean I'm having trouble again...and nobody wants to have that!!
|
|
|
|
1
2
3
4
5
6
7
8
9
10
11
12
13
14 |
|
Main 33
Coupe Page |
|