33 Coupe Adjusting and Tweaking 6
8/08/07
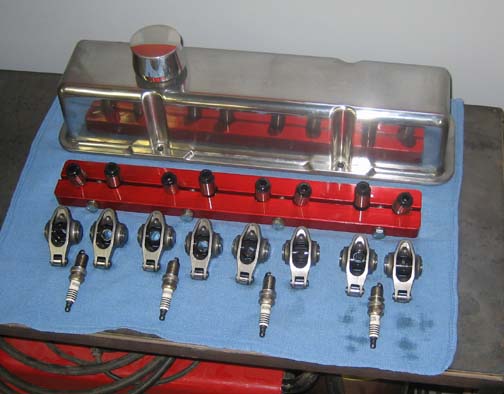
While I was waiting for the valve stem seals
to come in, I started in on the other side because I
didn't find any broken springs over there (broken springs = torn-up
valve seals). After removing all the
rockers and sparkplugs, I was ready to get to work. Now one of the
things I found out was, if you take out all four sparkplugs (because
they had to come out eventually) and then connect the air line, the
air pressure was a little greater than what the engine could hold.
What I mean is, the motor rotated once I plugged in the air line.
Like I said earlier, this procedure is new to me so to make sure the
piston stays at top dead center, I put three of the sparkplugs back
in. That made it harder to turn the motor over and now I was back in
business.
|
|
 |
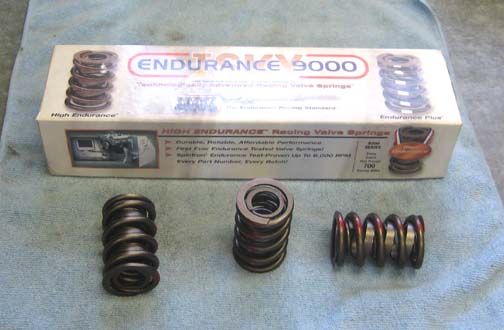
The new valve springs that I'll be using are
the Endurance 9000's, made by Iskenderian. These are a dual spring
design (like my others) but they also have a damper in them. The damper is
there to reduce spring harmonics and is placed between the two
springs. It looks like a spring in it self (because it's coiled up)
but instead of being round like the coils of the springs, they are
made out of thin flat stock. The spring material is a chrome-silicon mix and they measure the
same as my old ones at 1.550" O.D. The seat pressure is 210 lbs. @
1.900" (vs. 195 lbs. for my old ones at the same height) and the
open pressure is 520 lbs. @ 1.240". This stronger spring should be
fine, even though it has a little heavier pound rating. And if
anything, springs don't get stronger with time, they get weaker.
|
|
 |
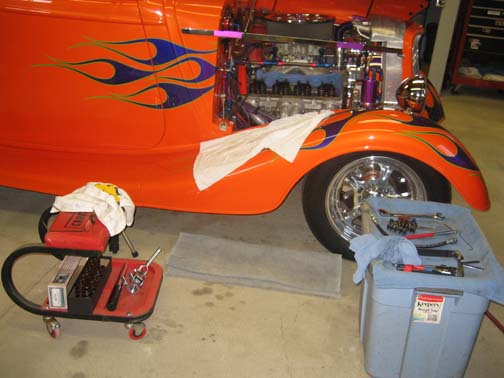
| Here is my fancy work area. I used a plastic
storage bin for one of my work benches, and my seat with wheels for
the other. It doesn't get any more high class than that! Now because
the engine sits so low, it was easier to be on my knees instead of
standing (notice the towel on the ground). This worked out pretty
good but took it's toll on my back (it's hell get'n old).
If you look close, you can see my remote starter switch hanging
from my hood support. This made it easy to bump the motor around to
get the pistons at top dead center and I used it to adjust the
valves too.
One of the hardest things I encountered was to replace the valve spring
retainer clips because of the limited space you have to work with. To help
me remove the retainer clips, I used a magnetic wand that swivels.
It worked great for this kind of thing.
|
|
 |
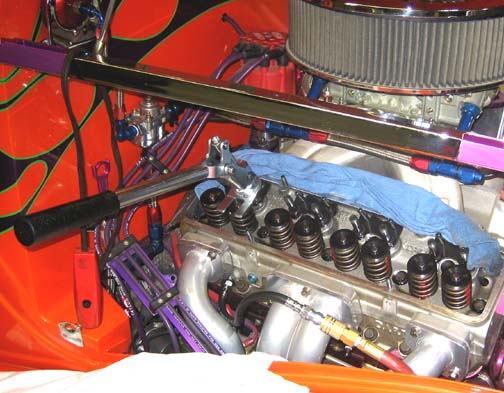
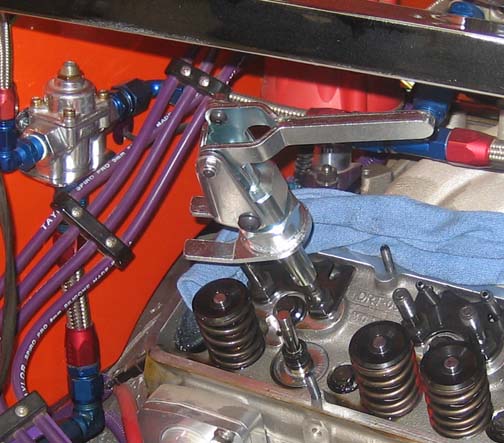
| Here you can see the valve spring compressor
screwed onto the rocker stud. The part of the compressor that comes
in contact with the spring retainer is adjustable. After finding the
sweet spot that worked for me, I locked down the jam nut to keep it from
moving. Also notice the rag along the back of the head. This was
just a precaution in case a spring got loose and flew across the
garage. It wasn't meant to catch the spring, it was meant to keep
the retainer clips from going into the oil drain back holes. Hey,
you can never be too careful.
At this point, I'm ready to compress the spring. Once the handle
is pushed down, it locks into place allowing you to remove the
retainer clips and then release the tension on the spring so you can
remove it. This is
where the nerve racking part comes in because the only thing holding
the valve up, is air.
|
|
 |
| This should give you a better idea of how the
compressor works. Once you have the spring removed, you can then
take off
the handle and swing the compressor out of the way. This allows you
to remove the spring and inspect the valve stem seals.
There was good news and bad news on this side of the engine. For
the good news, every valve stem seal was in good shape. The bad
news, I found two more broken inner springs. Now this shocked me
because when I was adjusting the valves the other day, I was looking for
more broken ones. But the two new ones that I found on this side didn't break
like the others did. What I found was that the very last coil had
broke off of each spring. I guess with only one coil broken, the rest of the spring
was still riding on it, (appearing to be in one piece) but once I removed
the spring, things were different. I figure the reason why either
seal didn't get wiped out was because the broken part of the spring
was being trapped in two directions. The first, the broken part was under the
spring never touching the valve seal just above it, and second, it was being held by the valve guide
so it couldn't go side-to-side. The
valve seal rides on the valve stem and over the valve guide, but not all the way
down to the
heads surface. That small spot that the seal doesn't touch is where
the broken spring was at. At least that's my thoughts on the matter.
With the old spring out of the way, you replace that one with a
new one along with the spring retainer. That's the easy part because
now it's time to replace the clips. The opening in the retainer
(where the clips go) and
the valve stem has to be equal for both of the clips to fit. If it's not
equal, only one will fit. This is where I found out how to work with
the handle (which I moved from side to side) in order to get both
clips installed. Sometimes I would have to remove the clips, release
the spring and
then recompress the spring because I had the spring compressor off center. When
that would happen and I only had one clip in place, I'd take my
magnet, remove the clip and start all over. This happened a few
times but all you can do is take a deep breath and get back to it.
This tool worked pretty good for a quick spring change (that
doesn't require you to remove the heads) and it was easy to use,
once I got use to it. There were times that I had to remove the
push-rod because the back of the compressor would sometimes hit it.
The reason for this was because of the position of the cam. Some
lobes would be up and others would be down. Depending on which way
they were would determine if I removed the push-rod or not.
Let's take a look at the side that
needs the new seals.
|
|
 |
|
1
2
3
4
5
6
7
8
9
10
11
12
13
14 |
|