|
I bought a gun case awhile back and the inside is made with closed cell
foam. What I need to do is cut this foam out so it fits my firearm nice
and tight. The good news here is, this foam cuts very easy, but the bad
news is again...it cuts really easy. It would be simple to just grab a
kitchen knife and go at it, but what if you wanted it to look a little
more professional?
What I mean is, there's more than one way (or method) of cutting this
foam out but I don't want it look like a hack job. For instance:
razorblades, E-acto knife, electric meat cutting knifes would all work
here. However, getting a nice vertical cut with those tools is much
harder than it looks. And I want the cutouts to have nice straight walls
when I'm finished. Not to mention the scalloped look that a razorblade
or E-acto knife would produce because this foam is 1 3/4" inches thick.
Now the electric meat cutting knife with it's longer blade would cut
all the way through with less of a scalloped look for sure, but it
wouldn't be able to make a tight radius or ninety degree turn because of
it's blade width (approximately 3/4" to 1"). So how do you end up with a
vertical wall, a nice tight radius or a ninety degree cut?
Well after researching this I found out there's something called a
'hot wire foam cutter' that works pretty good at cutting this foam out.
And this hot wire foam cutter will accomplish all of the tasks that the
knives won't do (at least as well) but will give me everything that I'm looking
for: nice straight vertical walls without the scalloped look, is able to
make any radius or ninety degree cut that you'd ever want.
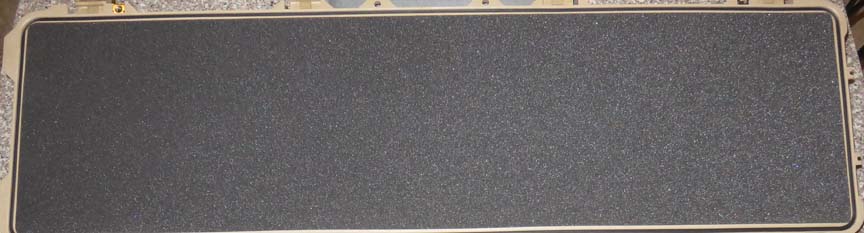
I also found out these foam cutters can be expensive when you buy a
larger model, which is what I would need because the foam that you see
below is 52" long. On the other hand I also found out that you can buy a
few components and make one yourself on the cheap, so that's exactly
what I'm going to do.
|
|
|
|
I'm going to need a few things to make this foam cutter,
like
some kind of a surface or base to slide the foam on, special wire to cut the foam with, a
small transformer, a dimmer switch and a small amount of electrical
wire.
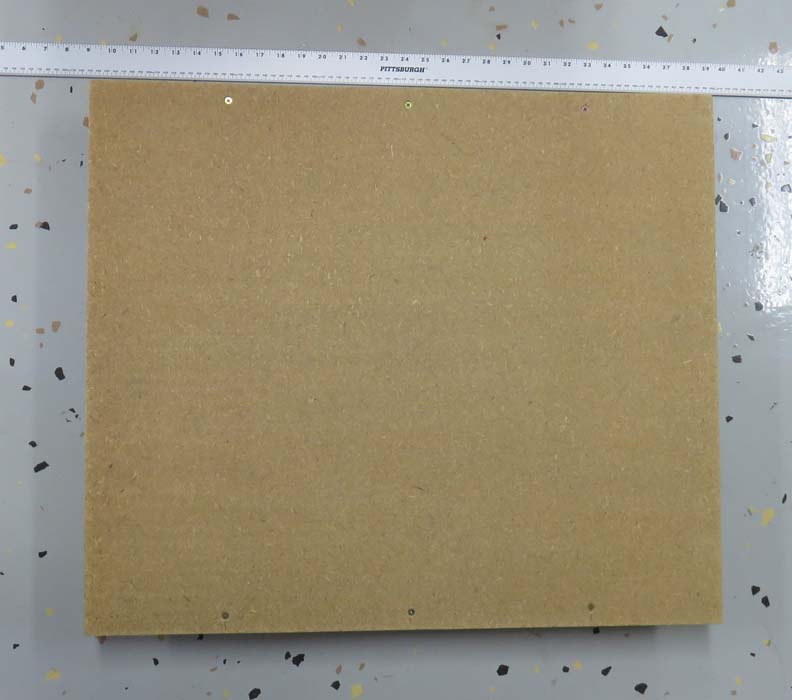
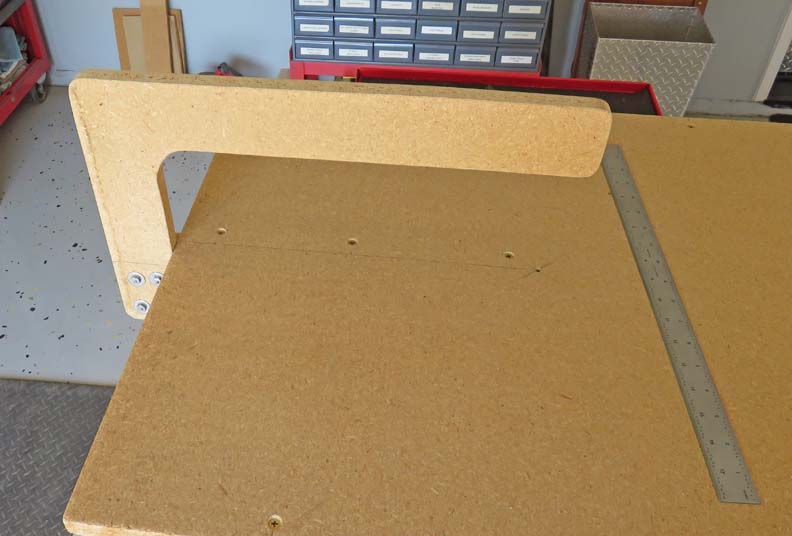
I had a piece of particle board laying around so I used
it for two of my components: the 'base', which is 28" X 24" and the
'arm'
which I'll talk about later. I would have made the base longer if I had
a larger piece of material but this is what I had laying around at home. However
I could have bought a new sheet and made the base whatever size I
wanted but I decided this should work for me. Besides, this is something
I won't be using much, if ever again.
Note the screws near the top and bottom, I fastened some 2 X 4's to the
bottom side as legs.
|
|
 |
|
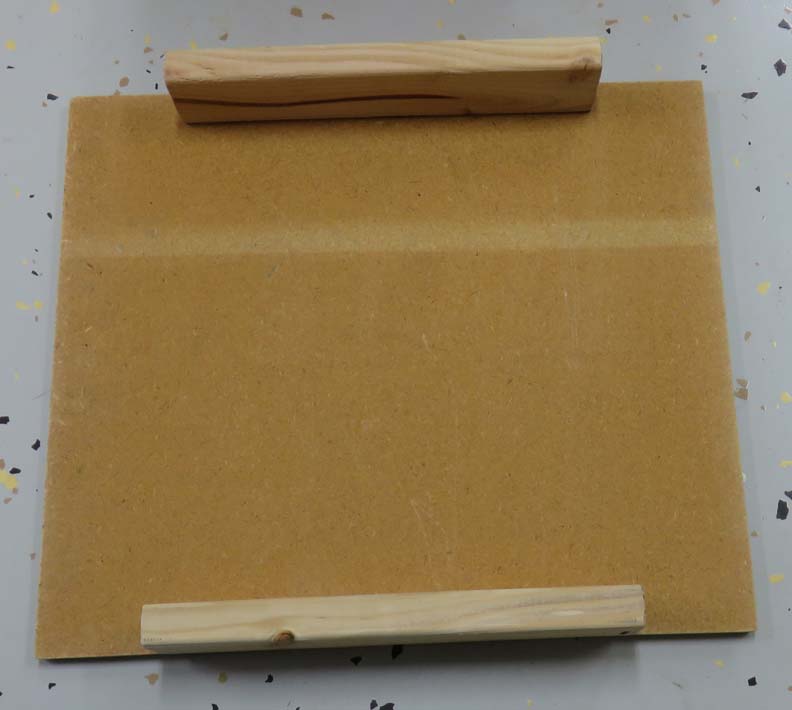
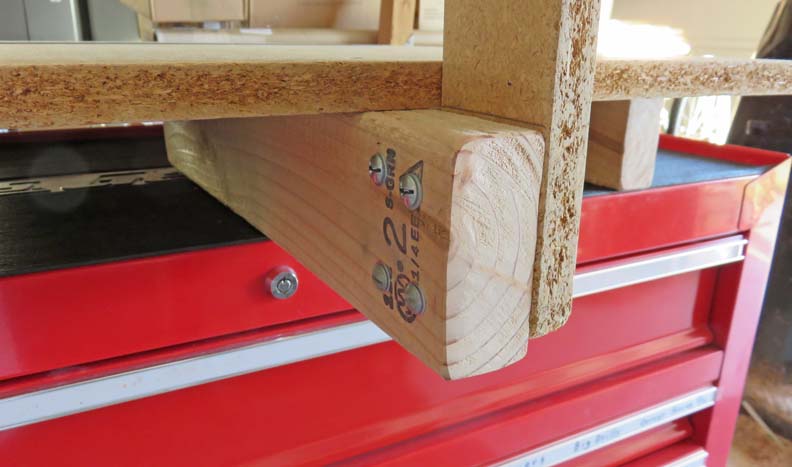
The 2 X 4's are another thing I had laying around and
will be used to raise the base so I can mount the electrical
components to the underside.
|
|
 |
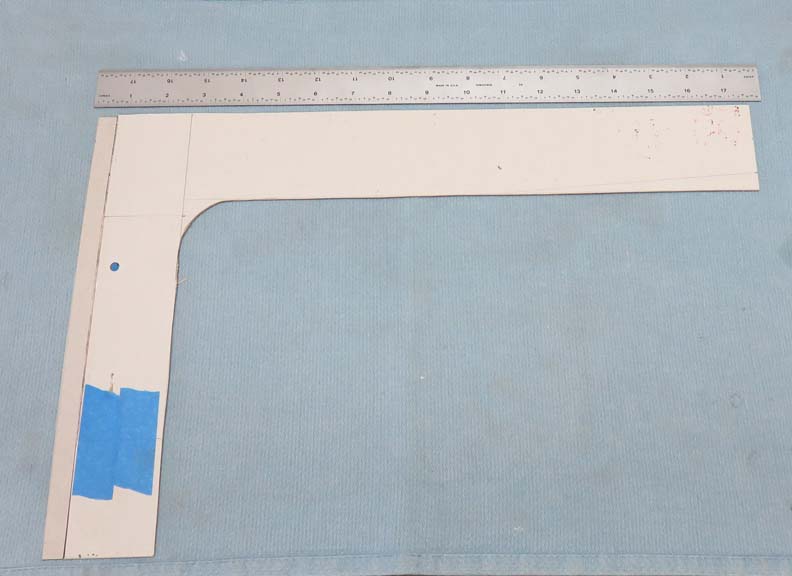
I'll need an arm to mount the 'cutting wire' to and I'm getting a few
ideas with this cardboard. The foam will slide
under this arm when being cut and I'll locate the wire at the end of the
arm, which will end up in the center of
the base for maximum cutting size.
|
|
 |
I cut another 2 X 4 and fastened it to the base (note the screws) so I
could mount the arm to it. I also drilled a small hole in the center of
the base (3/16") for the cutting wire can pass through. I'm not sure how
large this hole should be but I can always open it up later if need be.
I gave the arm a nice large inside radius which adds strength because
I'm not sure how much tension the wire will have when I'm finished. Just
looking ahead here.
|
|
 |
|
Here you can see how I mounted the arm. I used four
screws to fasten them together with because I didn't think two would be
enough to keep it from moving. Overkill? Probably.
|
|
 |
|
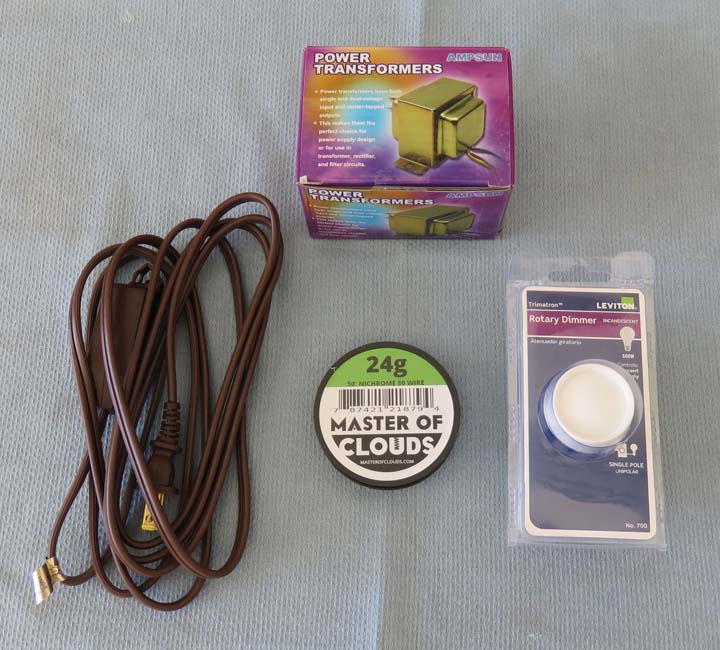
Electrical
Here are the electrical components that I'll be using. I'll need to plug
my foam cutter into 110 volts so I bought a nine foot extension cord
that will be used for this. I cut off and discarded the female end and
used this for my line voltage. Another item that I bought from the
hardware store was a dimmer switch. This dimmer switch will be used to
regulate the line voltage going into the transformer.
The transformer and coil of wire I bought online because we don't
have stores like Radio Shack around here anymore. The transformer
outputs 24v at 2 amps and the input of course is 110 volts. One thing
about this transformer that I didn't like was it didn't tell me which
wires were input or output. A quick search on their website gave me the
answer but I don't see why they couldn't include that info inside the
box. I mean there are only four wires total, they could have easily printed
that on the outside of the box as a minimum.
This coil of wire is special and is called 'Nichrome,' which will be
used to cut through the foam. Nichrome
wire is short for "Nickel Chromium" and is used in a wide variety of
devices where electric heating is required. Almost any conductive wire
can be used for heating, but most metals will quickly oxidize when
heated in air. When heated to red hot temps, Nichrome wire develops an
outer layer of chromium oxide, thermodynamically stable in air, mostly
impervious to oxygen, and protects the heating element from further
oxidation. This makes it perfect to use in my application and it doesn't
cost much either.
This roll of wire is 50 feet long but I'll only need about one foot. However I
used more than that which I'll explain later. The hardest part about
picking out this type of wire was the gauge size. I had no idea if I needed a
thin or thick wire size so I had to wing it here and picked a thin one.
In case you were wondering about the cost of the different wire sizes, they're all about the same.
BTW, the higher the number size the thinner the wire is. In my case I
used 24 gauge, which is on the thinner side but it worked great.
|
|
 |
|
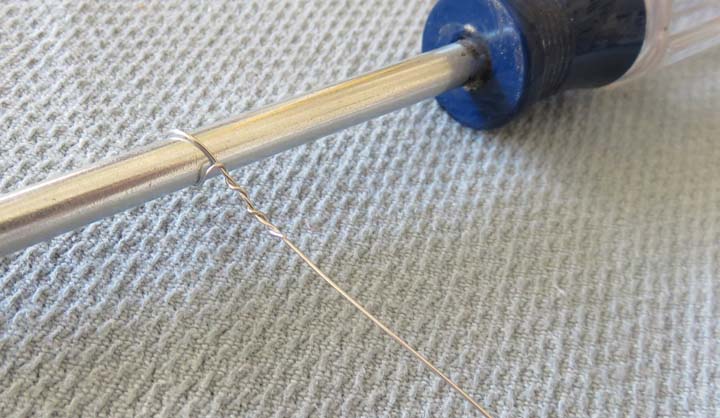
The Nichrome wire is easy to work with and here I'm
putting an eye on one end. The reason for this eye is because I'm
using a screw to hold the wire in place and winding it around a screwdriver
made this easy to produce this 'eye'.
|
|
 |
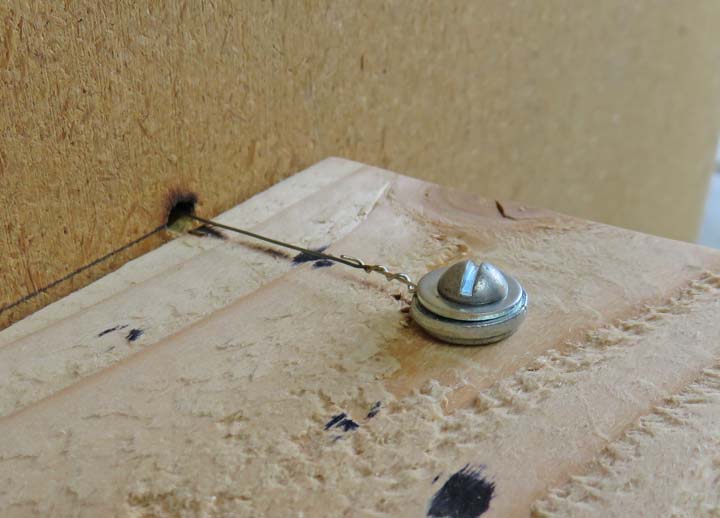
Here you can see it in place under the base. I used two washers to space
the wire away from the wood and then placed another washer on top to
sandwich it with. This was the permanent side of the wire and wouldn't
need to be removed unless the wire broke or some other unforeseen thing
happened.
|
|
|
|
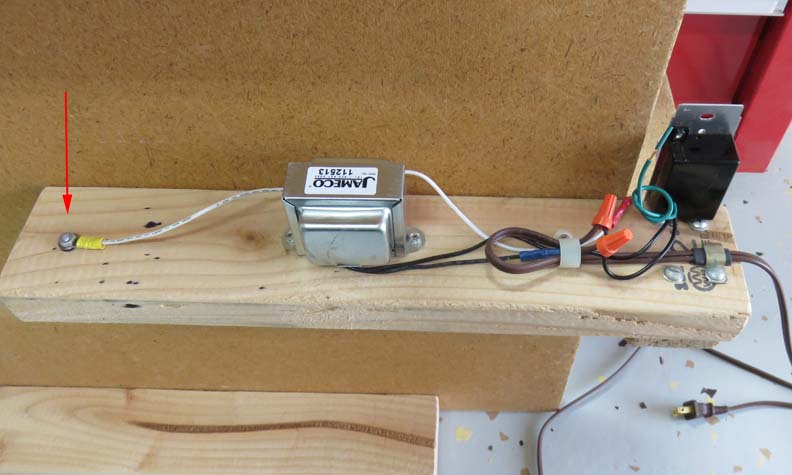
Looking at the other side of the board you can see the electrical
wire attached to the same screw (arrow). This wire provides the 24 volts
coming from the transformer. The line voltage goes through the dimmer
switch and then to the transformer. Very simple stuff here.
|
|
 |
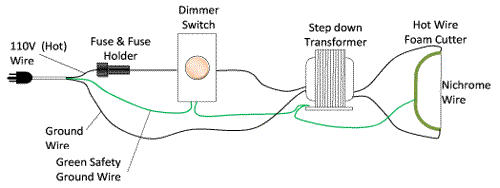
Here is the wiring diagram that I used in case you wanted to make one
for yourself. I didn't use a fuse or the green ground for mine but it
would be a good idea if you did.
|
|
|
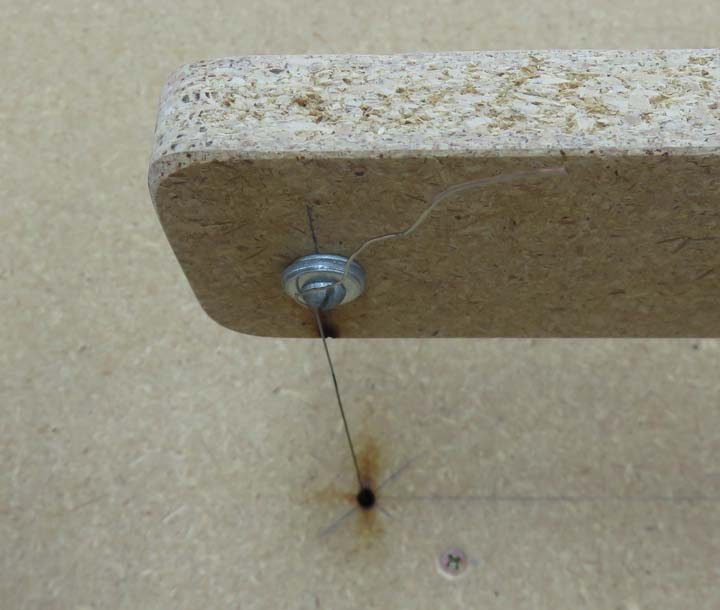
On the top side the other end of the Nichrome wire was
just pulled tight, wrapped around a screw and then tightened. I used a
wing-nut on the back side which made it easy to snug down.
|
|
 |
|
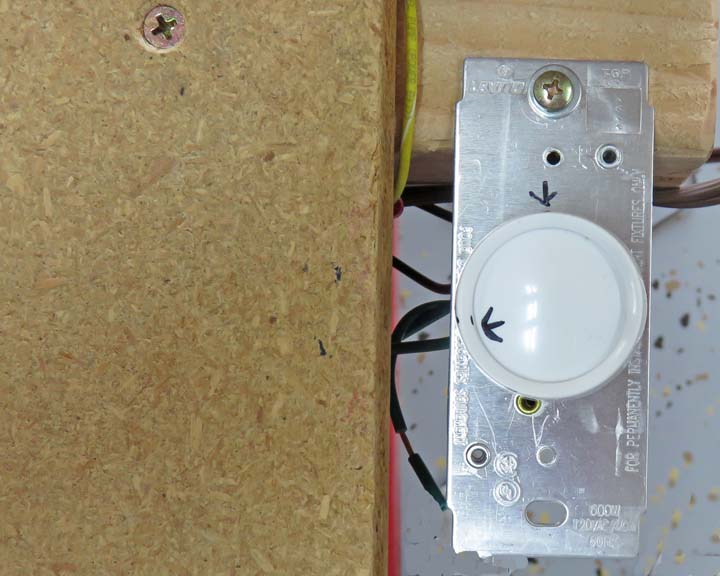
Once I plugged the unit in, I slowly turned the dimmer
switch until the wire became red hot. At this point I backed off the
dial a small amount and marked it with an arrow for reference. This way
I could have the same settings every time. Crude but whatever works you
know...
|
 |
|
1
2
3 |