January thru June 2008
33 Coupe Having Fun 22 4/03/08
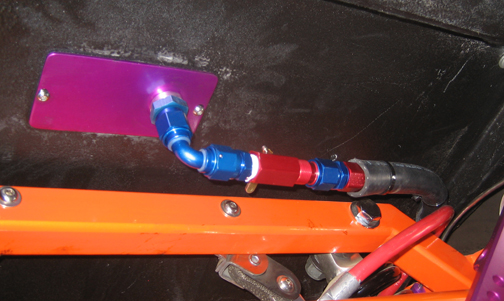
| The next item that I installed was my fuel shutoff valve,
which I should've put
in when I built the car. The valve is the longer red piece in the middle
and has a quarter turn ball valve inside with the handle on the top. I
could have mounted it in any position because the fitting that it
connects to has a swivel. To install the new valve required two
things, shortening the fuel line and adding a straight fitting. My old
fuel line had a 90 degree fitting on the end (which ended up not being
used at all) and the new one that you see here called a 90 degree coupler fitting
because it has female threads on both ends. Oh, in case your wondering
about the funny looking black stuff covering the fuel line, that's
because I had a problem and got real lucky in the process.
|
|
|
|
Let's go back a few days so I can tell you what happened. I was
getting ready to drain my fuel line to replace my fuel pump, which means
removing one fitting and replacing it with another. The fitting I'm
referring to is like the one you see above,
which goes into the gas tank. What I do first is put a bucket below this
area because when I remove the gas line, the fuel comes out and sprays
all over the place until it's completely unthreaded. Once that's done, it's time to thread on a cap to seal off the flow of fuel, which
only takes a few seconds, if everything goes right. Sounds easy but in
the process, you get soaked in gas. That's how the process should go,
but I had a different out come.
While I was unscrewing the fitting with the gas leaking all around
and soaking me, I pay close attention to
where the fuel is spraying, making sure it doesn't get into my eyes. Right
when the fitting comes loose is when you act as fast as you can and put on the other
fitting (the cap). Now I've done this a few times without any problems
but this time the braided line found it's way to the positive battery
post and the sparks flew. Remember, this is braided "stainless steel"
line and when the one end touched the terminal, the other end of the
line was against my stainless brake line making a nice ground.
Now I've got one hand on my fuel line when the sparks started flying,
along with a nice shower of gas under the car, and it's running down my arm, into my armpit
and along my side. The first thing I did was try to pull the line away
from the battery post but for some reason, I managed to hit it one more
time while doing so. This made for another set of sparks but for some
reason, most of them traveled towards the other side of the battery and away
from me. Once I had moved the fuel line a safe distance away, I reached
for the cap and sealed off the gas tank. Now if there
was ever a time that was primed to go bang, this was it, so you talk
about getting lucky!!
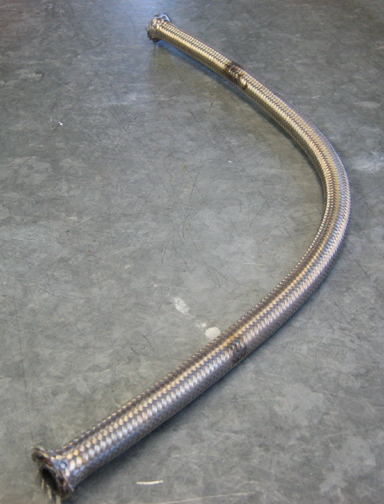
Here is my old fuel line with two burn marks. It was
bad enough to eat through the braided steel line and fry it (towards the
top) so this piece goes into the trash. Plane and
simple, I got lucky!
|
|
 |
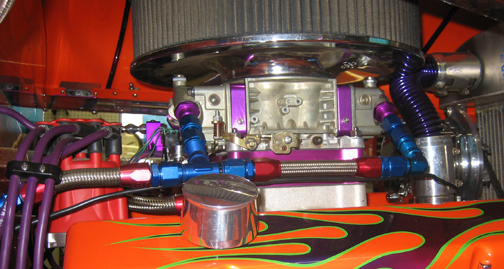
| Moving forward to the present again, this is the completed fuel line that is now finally done
(below).
It starts at the carburetor fuel bowls that have some new purple
fittings and they attach to some couplers that thread into a
90 degree fitting on the right and the T fitting (that I've been waiting
for) on the left. The small braided steel line between the two fittings
is one of the pieces that I had to make and it had to be exactly the right
length or it wouldn't work. If you've ever messed with braided steel
line, you'd know that it's not easy to end up right where you want it, so
the "measure twice, cut once" rule really applies here. One
other item that I thought would look good was some purple metering
blocks for the carburetor. These are solid aluminum and only come with
gaskets and vent whistles. To install them means swapping out my old
jets and power valves to the new blocks which only takes a few minutes.
They have the same four corner idle system as the old ones do and they complement the
other anodized pieces pretty well.
To adjust the new metering blocks, you start the engine and slowly
turn each screw the same amount till you get the highest vacuum reading
on your gage. The new parts didn't come with any instructions but this
is how you tune the Holley parts. To start off with, I ran the screws
all the way in and then backed them off one full turn each. I figured that
this should get me into the ball park and then once the engine was
running, I could fine tune it.
It was time to start the car so I hooked up both battery cables and was ready to fire up
the engine. After cranking on the starter for what seemed like way to
long, the engine finally came to life, but ran very ruff. Well the good
news was that my new starter worked pretty good but the bad news was
that the engine wouldn't stay running.
After keeping my foot on the pedal so I could warm up the car, I got
out and started tuning on my new metering blocks. After playing with the
screws for a few minutes, the engine wanted to die no matter what I did.
And you talk about running to rich!!
When you turn the screws in, this puts less fuel into the motor. Once
I had the screws turned all the way in and it still didn't want to idle,
that wasn't good. I turned off the engine and went outside to get some
air because I've never had the garage so full of rich exhaust before.
Gas maybe, but not exhaust :~]
One thing led to another and off came my new blocks and on went my
old ones. After everything was tightened and ready to go, I turned the
key and the engine ran just fine again. What the hell's up with that I
thought?
Needless to say, the picture below isn't the way the engine looks
anymore because I've sent those new metering blocks back where they came
from and got my money back. To bad because I liked the way they looked.
|
|
|
| Now that the car runs again, it was time to take it out
and make sure it ran right. When I got off work on Friday, I took it for
a test drive around town just to make sure things worked and that I
didn't have any leaks or funny noises.
The next day, Saturday, we took the car to a show in Moreno Valley. And I'll have to say, I was nervous because thoughts of
getting towed home were still on my mind. Everything went just fine that
evening so
check back in a week or so and I'll have another update for you about
that show.
|
|
1
2
3
4
5
6
7
8
9
10
11
12
13
14
15
16
17
18
19
20 |
|
21
22
23
24
25
26
27
28
29
30
31
32
33
34
35
36
37
38
39 |
|
40
41
42
43
44
45
46
47
48
49
50
51
52
53
54
55
56
57
58 |
|
59
60
61
62
63
64
65
66
67
68
69 |
|